In my last post, I covered some of the complexities of implementing Safari push notifications including 4 URLs that your application must respond to for push notifications to function correctly on your site. Since then, we've added the ability to use ZeroPush as your complete backend solution for Safari push notifications, including serving your push package, registering/unregistering devices, and logging errors that may occur.
I'd like to walk through adding Safari push notifications to a website, using ZeroPush.
- Create an account
- Upload your files
- Add the javascript to your site
- Send notifications with our API
Prerequisites
We still have the same prerequisites to sending Safari push notifications as before:
- Sign up for a iOS or OSX developer account on the developer programs page.
- Create a unique website push ID to distinguish your site from others on the website push IDs page.
- Generate a certificate/private key pair used to encrypt your communication with the APN (Apple Push Notification) service.
Creating a Website Push ID
- Login to your Apple developer account.
- Visit the Certificates, Identifiers, & Profiles page.
- Select Website Push IDs from the menu.
- Click the plus button and add the details for your website.
- Press continue, and verify your information is correct.
- Finally, press the register button and your ID will be saved.
Generating certificates
- Login to your Apple developer account.
- Visit the Certificates, Identifiers, & Profiles page.
- Select Certificates from the menu.
- Click the plus button to add a new certificate.
- Select Website Push ID as the certificate type and press continue.
- Choose your Website Push ID from the dropdown and select continue.
- The rest of the certificate generation will continue like creating certificates for native applications. See our Generating Certificates guide for more details on generating certificates.
In addition to your newly generated certificate, you will also need an icon to represent your website. The icon is shown when you request permission to send notifications, in the System and Safari preferences for notifications, and with each notification.
Configuring the ZeroPush application
- Login to ZeroPush and visit the new application page.
- Choose 'Safari' as the type, give your app a name, and press Save.
- Export your certificate from Keychain Access.app, by right clicking on the certificate and choosing 'Export'.
- Press the Open file button on the page and select your exported certificate, also enter the passphrase for the certificate if you added one during export.
- Turn the 'hosted push package' switch to 'ON' to allow ZeroPush to host your push package.
- Enter the information in the fields required to build your push package and press Save. An explanation of each field is available by hovering over the field's identifier.
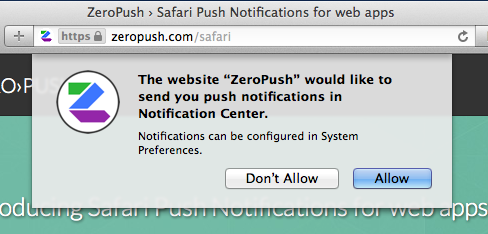
Requesting permission
You are now ready to request your website visitor's permission to send them push notifications.
Include the generated javascript snippet, from your application's settings page, on your site. Once the page has loaded call the requestSafariPush() function. Your user should be presented with a small menu to allow your site to send push notifications.
Sending notifications
When your users allow Safari push notifications from your site, Safari sends a request to your ZeroPush subdomain containing the user's device token. ZeroPush will associate that device token with your application, and when you are ready to send notifications, you can use the ZeroPush API to send a broadcast notification to all of your users who have registered.
Below is a code sample to send a broadcast notification using our ruby gem. A web based console to send broadcast notifications is coming soon. As always, please email me with any questions.
require 'zero_push'

ZeroPush.auth_token = 'server-auth-token'
ZeroPush.broadcast({
  title:    'New Product Release!',
  body:     'One of your favorited stores has a new product',
  label:    'See Store',
  url_args: ['store_id', 12345]
})